Windfall Applesauce

For me, crisp apples are synonymous with Fall. And as fun as it is to go apple picking with the kids, for me it's even more exciting to happen upon an orchard of gnarly old apple trees out in the middle of nowhere. There are tons of them around New England, sometimes at the edge of someone's property but often the abandoned trees are part of a state forest or preserve. When we come across old apple trees at this time of year, I love to collect an armful of fallen fruit. Though their skins may be tough and the ants or worms might have gotten there first, windfall apples can make great applesauce. This recipe is easy as pie and makes the house smell wonderful.

Windfall Applesauce

  • Wash and peel apples, then chop them into roughly 1/2 inch pieces. If part of the apple is inedible for any reason, simply cut it away. As you do this, marvel at the intricate pattern left by a tiny insect or worm who obviously enjoys apples, too...
  • Add apple pieces to a medium-sized saucepan in a roughly even layer
  • Add enough apple juice to barely cover
  • Add a couple cinnamon sticks or ground cinnamon to taste
  • Bring to boil, then reduce heat and simmer for 1/2 hour or so
  • Remove cinnamon sticks, wash and set aside
  • Mash apples roughly with a potato masher or use a handheld blender or food processor if you prefer your applesauce smooth
  • Add a bit of honey or agave to taste
For the kids (or kids at heart), serve with the cinnamon sticks as makeshift spoons!

Sharing Our Abundance

A short reflection today about the nature of our abundance here in middle class USA. As my family and I prepare to move across the state, I am confronted daily with our modern materialism as I attempt to sort through and pack up all of our household belongings. Over and over again, I am reminded of how, when I was living in a small village in Africa as part of the Peace Corps, local children would sort through our trash each week before we burned it. They would scamper away happily with all manner of items, including empty match boxes, tomato paste tins, old newspapers, empty spaghetti boxes. There was no telling what each one of these things might become in the hands of children accustomed to playing primarily with sticks and the mud they scooped up from giant termite mounds.

So this time around, I am determined to conduct an "environmentally responsible move", for lack of a better term. For example, we have made endless trips to our local grocery stores for empty fruit boxes (banana ones are the best!). I have been hoarding newspaper from recycling bins for wrapping delicate items, and using clothing, towels and scarves for that purpose as well.

We also wanted to avoid throwing away all the things we that don't want to bring with us to our new place. How much stuff does the average household contain that is truly extraneous? The answer, for us, was appalling. Instead of simply filling up the trash bags, we are making a serious effort to pass along or upcycle everything we don't need. Boston Boys and Girls Club picked up a large load of baby clothes, furniture, toys and books recently. They will sell the items and use the proceeds to fund their youth programs. A selection of textbooks and classic fiction was mailed to a group that ships them to African libraries. I also hosted a clothing swap a few months ago with friends and donated any items that didn't get swapped to a local thrift store that supports HIV outreach efforts. If we weren't moving, I had planned to organize an art/craft supply swap this fall to clear out that cluttered part of the house.
Over the past couple weeks, I've spent many hours posting descriptions of items to Craigslist, our community Freecycle group and parent listserv. Friends and strangers alike have come to claim things as diverse as frozen yogurt containers of home-cooked black beans, boxes of extra floor tiles languishing in our basement, and repurposed styrofoam coolers that have already had a second life as yogurt fermentation vessels. The parade continues... right now my front porch holds neatly labeled bags for pickup: suede couch pillows, a maternity belt, a dust buster, yoga videos, kitchen cookware, travel guidebooks, brass mail slots and the deadbolt from our old front door. They will all go home with someone grateful to have saved themselves both a stressful trip through traffic to the mall and a bit of their hard-earned cash.

As for us, after these efforts I know we will sleep just a little better in our new home, knowing that we didn't fill a small landfill to get ourselves there. For now, though, all is chaos!!!

http://www.freecycle.org/ (Give stuff to people in your neighborhood)
http://www.booksforafrica.org/ (Donate books to overseas libraries)
http://www.goodwill.org/get-involved/donate/ (Donate used clothing, home goods for resale)
http://www.habitat.org/env/restores.aspx (Donate surplus home fixtures, building materials for resale)
http://www.actrecycling.org/ (upcycles VHS tapes and provides jobs for the mentally disabled)

Potato Blues

The potato harvest is in, about a month or so early due to the unforeseen circumstance of deciding to move to Western Massachusetts with about 3 weeks' notice (!). According to my notes, I planted 1 lb of All Blue potatoes back in mid-May, which should have yielded 15-20 lbs of potatoes... but I only dug up 7 lbs. Admittedly, most of them are quite small and would surely have increased in bulk if I had waited long enough to harvest them. But not even half the expected yield??? It's also true that they were in a less sunny part of the plot this year. This is only my second year of growing potatoes and last year's crop also got pulled early due to the much-bemoaned late tomato blight of 2009, so I'm just not sure what to think, although I am grateful for what I got. Seven lbs of potatoes is still...seven pounds of potatoes! An abundance of potatoes by anyone's count.

I may try potatoes again next year, although since our new living situation includes all meals, vegetable gardening would be a gratuitous exercise. If I do, I probably won't grow blues again. I have to say, even though these are considered "gourmet", I find them just a bit creepy to look at! The blue is actually more like grey once cooked, and their insides lost their color completely. Fortunately, they are quite tasty in the various ways I've served them so far.

Below is a very simple, delicious recipe that requires almost no time to prepare: roasted rosemary potatoes. I've shamelessly borrowed the method from another blogger who posted it back in 2007. The recipe is reproduced below with a few small changes, including using fresh instead dried rosemary since it was all I had.


Rosemary Blues

Preheat oven to 425.

Combine in a cast-iron skillet or other large, shallow, oven-safe dish:

1.5 lbs blue potatoes, washed and cut into bite-sized pieces
1/4 cup olive oil

Cook 20 minutes in the middle of the oven, then turn off heat, stir potatoes to loosen their bottoms and let sit in the oven 10 more minutes.

Now toss with:
1 tablespoon sea salt
2 tablespoons dried (crushed) or fresh (chopped) rosemary

Serve alongside another dish with some nice color, like a tomato salad!

Great Greens! Part IV

This summer I have discovered through sheer garden neglect exactly how much of a superstar kale really is. Not only does it top out with the highest ANDI score of all the vegetables, the kale plants in my garden that started off as a decent fall crop last year, then overwintered in my zone 6 garden to produce an abundant spring harvest - drumroll, please - grew whole new plants this summer from the scraggly stalks I had let go to seed, each one producing a full size bunch from one little side shoot! Which presents me with an unexpected opportunity to enjoy even more super-local kale. Yippee! If only my children were so excited about the prospect.

I decided to utilize a strategy that has served me well in the past when entertaining guests who are skeptical about the potential pleasures of whole-grain, vegetarian cooking. Rather than disguise the item in question, I like to package it in such a way as to be irresistable. In this case, kale-pine nut spanikopita to the rescue! For those unsure about "spanikopita", it simply means spinach pie in Greek. It is often made into bit-sized triangles and passed around as an hors-d'oeuvre. I love two things about spanikopita: the buttery flakiness of the phyllo and its ability to incorporate ridiculous amounts of greens into a very tasty dish. While spinach is the typical green used, in Greece there are often other greens added, particularly in the springtime when all the wild greens are out. Then the little triangles are called hortapita (horta meaning wild green). Here's a funky recipe for hortapita from FarmPlate, a most excellent blog. I say funky because it has fennel in it (bleh!)

Hmm, maybe I should call my version KALEPITA! Oh, and the other nice thing is that it can easily be made vegan-style, without the feta cheese and using olive oil in place of butter. Finally, don't be afraid to use phyllo dough! The main thing is to let it thaw properly. If you rush it, you may end up with a crumbly mess as I did with this last version! But it still tasted delicious anyway.

Kale-Pine Nut Spanikopita (Kalepita)

1/2 package of phyllo dough, thawed according to package directions
1/4 cup butter, melted
2 T olive oil

2 T olive oil
1 medium onion, chopped
2 garlic cloves, pressed or minced
1 large bunch kale or other greens -collard, chard, spinach - leaves stripped from stems, chopped into 1 inch pieces and washed well (salad spinner works great for this)
1/4 cup chopped fresh dill or 2 T dried dill (less if you're not sure how you feel about dill)
1/4 cup chopped fresh speariment leaves or 2 T dried mint

1/2 lb firm tofu, crumbled
1/2 to 3/4 lb feta cheese, crumbled (Trader Joe's is quite good, imported from Greece - save the fancy feta for your mezze plate)

1/4 cup pine nuts, lightly toasted (toaster oven or dry skillet on med-low heat - don't let them burn!)
  1. Heat 2 T olive oil in a large skillet on medium heat. Saute onion 5 minutes, then add garlic and cook 2 minutes more. Stir in kale pieces, cover and cook over med-low heat for 25 minutes.
  2. Stir dill, mint, tofu, 1/2 lb feta and pine nuts into the kale mixture. Sprinkle in 1/2 t black pepper and taste to see if either salt or more feta seems needed. It should be pretty tasty at this point. But it will get tastier when tucked inside the phyllo!
  3. Warm the butter and add 2 T olive oil. Hunt down a pastry brush. Get out the phyllo dough and lightly oil the bottom of a 9" x 12" or so casserole dish. Preheat your 350 degree oven.
  4. Working quickly but carefully, begin to butter and layer half of the phyllo sheets in the bottom of the casserole dish. It doesn't matter if they get torn, and any part of the sheet that hangs over the edge should be folded down into the dish. And don't stress if exactly half don't make it into each layer - this is not an exact science.
  5. When half of the phyllo has been layered, spread the entire kale/cheese mixture over the top of it. Make sure the whole surface is covered or someone will get a disappointing piece of the pie.
  6. Repeat Step #4 until the remaining phyllo sheets have all been used, brushing the top sheet with butter. If you run out of the butter/oil mixture, just add more butter or oil to the bowl as your conscience allows. Some people - or so I've heard - sometimes take the lazy way out and use spray olive oil instead of brushing each sheet. But please don't tell my Greek inlaws!
  7. Bake the dish in the middle of the oven for 35-40 minutes. It's done when the top is lightly browned and your home smells like a village plateia at around 10pm when everyone is out enjoying their supper.

Zucchini Monster Muffins

 
Whether monster zucchinis lurk in your garden under big leaves or are piled high at the produce stand, when huge summer squashes start showing up they have to be dealt with one way or another. In general, muffins are a great way to hide all kinds of fruits and vegetables. They are highly portable and great for snacks, brown bag lunches or road trips. I typically freeze half and leave the rest on the counter. They disappear within a day or two.

This recipe originated from the Food Network website. With significant modifications it is still tasty and quite a bit healthier than it started off.
 
  1. Mix in one bowl:
  • 1-1/2 cup whole wheat flour
  • 1-3/4 cup white flour
  • 1 t salt
  • 1 t nutmeg
  • 1 t cinnamon
  • 2 t baking soda
  • 1-1/2 cups sugar (some people like a bit more than this)

 
2. Mix in another bowl:
  • 1/4 cup raisin or other dried frut puree (dried fruit can be reconstituted in boiling water, then pureed, or you can use baby food)
  • 1 ripe, mashed banana
  • 2/3 cup canola oil (half the oil still yields good results)
  • 1/3 cup applesauce
  • 3 eggs, beaten
  • 1/4 cup ground flaxseed
  • 1/3 cup soymilk, milk or whey drained from yogurt
  • 2-4 cups grated zucchini or summer squash, drained (1 monster zucchini or 2 medium ones)
  • 1 t lemon juice

3. Pour liquids into dry ingredients.

4. Stir in 1 cup ground walnuts or pecans

 
If batter seems quite a bit wetter than usual muffin batter (e.g. it drips off your spoon rather than coming off in big glops), add some more flour and/or a cup of oats. The wet batter may be a result of not draining the squash enough.

 
Pre-heat oven to 350 degrees and spray muffin tins with non-stick spray or wipe with oil.
Bake both muffin trays together for 30 minutes, switching trays in the oven halfway through. Or bake a loaf for 1 hour or until a toothpick in the center comes out clean. Makes approx. 24 muffins.

Bringing Lunch

There are A LOT of places to eat in the neighborhood where I work. Fortunately, most are sit-down restaurants and as a working parent, lunchtime has to be maximized, so I don't frequent them very often. And for some reason, the Boston area hasn't yet seen the rise of gourmet food trucks that I keep hearing about in other urban centers. So for now, it's bring your own lunch for me.

But who says bringing your lunch has to mean peanut butter and jelly in a paper bag? Below are some photos of my favorite lunch containers and a few comments about how I use them. Sure, an old-school insulated Thermos food jar would also work just fine, but until the foods trucks come rolling into Harvard Square, I like to have something to look forward to as I eat my leftovers each day. Incidentally, none of these containers can be microwaved, so I keep a dinner plate, soup bowl and utensils in my office and wash them each day. No escape from dishes!

Above is an Indian "tiffin", which is made of stainless steel. It contains two levels with a plate in between, and when assembled, has its own handle. Shown is a favorite meal of frozen blueberries and mangoes on the top (they thaw by lunchtime) and a quinoa-black bean-feta-pepita salad on the bottom. The tiffin fits nicely inside my Built lunch bag, with some extra room for an afternoon snack. The little bag is made by me out of PUL (polyurethane laminated) cotton fabric; I call it my "almond bag" and it reminds me to eat healthy nuts each day instead of heading for the vending machine!

This next photo is of a Japanese "bento box". It has an image of a rabbit on it so I call it my "bunny box." The top has a handy removable divided insert for condiments. Since the top has a lid and the bottom doesn't, I usually put grains or pasta in the bottom and the sauce or veggies on the top.

Below is what it looks like assembled. The other one is a "male bento box" whereas the bunny one is a "female" version. Not surprisingly, the male box is about twice as big so the big, strong, hungry man can eat more food! Ha, not in my house! I do sometimes use this one but don't like it as much because it looks so boring. I think these used to be made of lacquered bamboo, whereas now they're just plastic.

Finally, a photo of my latest acquisition: a plastic 4-tier, tiffin-style container from of all places, Target! We haven't given it a name yet, but fell in love with its great colors and large capacity. On Mother's Day we took it for a picnic and it carried enough food for everyone in the family to have lunch! What I also like is how the different levels serve as a reminder to include a range of food groups. Since this was a picnic, I wasn't too concerned with nutrition, but we had one level with veggies and dip, another with fresh fruit salad, another with cheese and crackers, and finally a level for that all-important dessert food group. Each level could probably hold a person's sandwich and veggies or a decent-sized serving of pasta salad if you wanted to divide the food that way. This thing is definitely coming to the beach with us this summer!

On a last note, we are also big fans of the Laptop Lunchbox, a modular plastic lunchbox that has four different sized colorful inserts to help remind us to include a variety of food groups and veggie/fruit colors. Enjoy your lunch today!

Foraging at Home

Each year around this time, I begin to get excited about the first round of harvest. Sure, there was the overwintered harvest, a bit worse for wear, and I've been picking individual radishes, lettuce and chard leaves, flower petals, green onions and herbs throughout the spring. But at the beginning of June when the farmer's markets re-open in New England, it's time to start thinking again about how to manage and make best use of the glut of fresh vegetables. Specifically, the big bunches of greens, and there will be several more posts about that.

But for now, it's time to start making space for the first harvest. Check the pantry and dig out the last few jars of green tomato salsa and chutney to mix with beans and fresh herbs as a salad or to serve warmed over rice. Stir a jar of quince jam and some cinnamon into a container of plain yogurt. Open the freezer and pull out that last bag local corn (remembering what a pain it was to cut it all off the cob last August!), the last container of pesto for a pasta salad, bake the last bag of chopped up fall apples into a pie. Decipher which re-used yogurt containers have mushy vegetables from making vegetable stock all winter long, thaw them out and mix with curried lentils for stuffing handheld veggie pies. Bake any remaining bags of blueberries into muffins.

This activity reminds me that it's been a while since I evaluated our stock of raw nuts and seeds, cold-pressed oils, whole-grains and whole grain flours. Many of these are kept in the fridge or freezer, but those stored at room temperature need to be checked for rancidity (easy to smell/taste it!) and if they are still okay, use them up as soon as possible.

It may not be quite as exotic as combing the deep forest for rare mushrooms, but foraging at home has its own rewards. It's a great way to save money by not wasting food, it facilitates buying local on as big a scale as your household can manage, and you may receive some culinary inspiration along the way. That said, I'm off to put together a black bean-corn-mango chutney-cilantro salad!

Save the Broccoli Stalks! Soup + Mahhvelous Mac & Cheese

It’s true that not everyone (cough, President-George-H.W.-Bush, cough) loves broccoli. Most of us are, however, willing to dip a few little trees in ranch dressing or eat the florets steamed or sautéed with butter and garlic or lemon. At least then we can say we ate our vegetables.

Professional chefs and serious gardeners might remind those of us who usually purchase pre-cut, bagged produce that broccoli florets don’t actually grow straight out of the ground. No, they actually occur in clusters along a thick stalk that can grow to be three feet tall. And go figure, broccoli has lots of leaves, too!
In the event that one does buy a bunch of broccoli from the store and prepares it in the usual sort of way, a question arises: What to do with all those stalks? A) Garbage disposal. Be careful to cut them up first. B) Trash can. Don’t risk clogging the disposal. C) Eat them, silly! The stalk is just as tasty and good for you as its more popular younger sister, the floret.

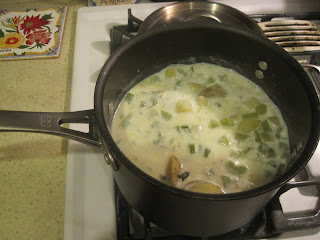
I first considered broccoli stalks when I noticed that they were an ingredient in a bagged coleslaw product from the refrigerated shelf in the produce section. Just like florets, the shredded stalks were delicious with ranch dressing. Then one day I wanted to make broccoli cheese soup, but all I had were the thick stalks hanging out in the back of the veggie drawer in the fridge. So I thought, why not? A few leaves got thrown into the pot along with the stalks. And guess what - the soup was delicious! I’m now fairly certain that both canned broccoli soup and broccoli soup served in restaurants are, in all likelihood, made from stalks, too. Try this recipe and see if you don’t find yourself saving the stalks from the disposal from now on.

I'll start off by explaining how to tackle the stalks, then list the ingredients and steps below. Note: an immersion blender is really what makes this recipe so fast and easy to make, but if you don't have one a blender or food processor will also work.

Broccoli prep: Wash and trim off the lower 1-2 inches from the broccoli stalks. (As you make the cut, you can feel it if you're still in tough stalk territory.) Using a sharp vegetable peeler or knife, cut off the thick, somewhat waxy exterior of the stalk. Make sure to get all of it - the outer part does not cook well and if you skimp here, as I occasionally do for speed, you'll pay for it later with little strings that you'll be picking out of your teeth as you eat the soup! Chop the stalks into 1/2 inch pieces. This whole part can be done ahead of time and either refrigerate or freeze the chopped stalks.

Broccoli Stalk Soup
Serves 4-6
Difficulty Level: Easy
45 minutes, including broccoli stalk prep
Freezes well
Ingredients:
3 or more stalks of broccoli, trimmed, peeled and diced (If you have twice that amount, use them all, but you may need to adjust the liquid and seasoning a bit near the end.)
4 smallish potatoes (organic)
1 medium onion
1 T butter
1 T olive oil
1 T flour
2 cups milk (unsweetened soymilk can be a substitute)
1-1/2 cups shredded sharp cheddar cheese
salt & pepper to taste

  1. Prep broccoli stalks.

  2. Scrub the potatoes, skins on, and microwave for 3 minutes on each side or until cooked through. Once they are cool enough to handle, cut into largish pieces and set aside.

  3. Chop the onion.

  4. Heat butter and olive oil in a large pot on medium heat. Add the onion and saute for a few minutes or until translucent.

  5. Sprinkle the flour into the pot and cook for 1 minute, stirring.

  6. Whisk in 2 cups of water and bring to a boil.

  7. Add the milk and return to almost boiling.

  8. Add the broccoli. Simmer vegetables in the liquid with lid on, for about 10 minutes or until completely tender. Test the broccoli to be sure!
  9. Stir in the potatoes and cheese. Add salt and pepper to taste.

  10. Puree with a handheld immersion blender (or pour into the food processor, then return to the pot - much messier to be sure).

  11. Wait for the applause!

While I'm feeling cheesy, here's one more recipe. As someone who was formerly addicted to Kraft macaroni and cheese (seriously, I would stand at the stove and eat the entire contents of the pot before I could get it to the table!), I can truthfully say that this recipe is good enough to pass muster. Kudos to the vegetarian goddess Nava Atlas for this recipe.

Mahhhvelous Mac & Cheese
Serves 1-4
Difficulty Level: Super Easy
15 minutes or less

12 oz package of elbow pasta
1 package silken tofu (the kind that doesn't need refrigeration)
2 T butter (oh yeah, the real stuff)
1-1/2 cups cheddar cheese
salt to taste

  1. Cook pasta according to package directions.

  2. Use a miniprep blender, immersion blender, or electric beater to blend tofu until smooth.

  3. Transfer tofu to a medium pot, then add cheese and butter.Heat on medium heat until cheese melts, stirring frequently.

  4. Stir pasta into cheese mixture and get comfortable standing in front of the stove as you eat it all from the pot.
Leftovers tip: To reheat, add a little milk first.

Mending Socks

This post is in honor of a wonderful man I'll call Grandpa L. Though it's been over a decade since he passed out of this world, I still think about Grandpa L. occasionally and am grateful for the many life lessons I learned from him. Like if you feel like having donuts or pie for dinner once in a while, don't worry about whether it's bad for you, just enjoy it! Another lesson I learned is that you can mend your socks. This may be a big "duh" to most people, but I actually had no idea this was possible until one day while I was visiting, Grandpa L noticed a hole in one of mine. The next morning I found the sock outside the bedroom door, with no hole in sight.

Grandpa L was skilled in the ancient art of darning, which I confess that to this day, I have never bothered to learn, though the results are quite amazing. With my eldest daughter's affinity for all things commercial, quality clothing is not something we've been able to invest in and I don't consider it a good use of my time to spend an hour darning a sock from Target's dollar aisle. However, that sock is actually worth much more than $1 to her, and in truth, to me as well - by the time we calculate replacement cost (i.e. the inevitable $200 I will spend at Target if I go to replace said sock) and the ecological cost (heavily sprayed cotton to produce the cheap yarn, toxic dyes, the container trip from China, etc.)

These $1 socks would have about a 3 month lifespan in our household if we just tossed them once the holes appeared.

So in short, since acquiring children (and a sewing machine) I have felt it worthwhile to mend many a sock, albeit in my own shortcut, non-skilled way. This easy technique works well for tights and the reinforced toes of nylon stockings as well.

You are going to need a sewing machine, and you are going to need to know how to thread it. Many of us are not quite there yet, and that's fine. When you do get there, one day you'll wake up to a holey sock and perhaps you'll remember that it can be fixed without too much trouble. It won't matter that I'll have long since stopped blogging and retired to my farm out in the country, because you won't even need my instructions. It's that easy.

Get the sewing machine ready with a coordinating thread top and bottom. Take the sock and turn it inside out. Wherever the hole is (usually the toes, but occasionally the heel is the culprit), pinch the sock together with both thumbs and forefingers so that the hole is effectively "closed" between your fingers. This is the area you are going to sew. Insert a straightpin parallel to where the stitch will be.
Turn your sewing machine's stitch to zig-zag and reduce the stitch length setting so that the stitches will be closer together (double-check your manual if you're unsure about where the stitch length dial resides). Test your stitch on another piece of fabric before sewing your sock.
Once you've got your sock set up on the machine (you may need to move the pin away from the sewing site a bit, as I've done), you'll want to sew the length of the hole, plus a little before and after it. Make sure to backstitch, as these socks do take a lot of wear! When you're finished, you'll have a stitch that looks something like this:
A simple matter of trimming the threads, resetting the dials and putting away your machine (or moving on to the next holey sock in the pile), and you've got a very rewarding outcome for your (fairly minimal) efforts. Just think how happy your little (or big) one will be to discover that Hello Kitty or Bob the Builder is back in the sock rotation! Great job. Now go get yourself a donut. :-)

Great Greens! Part III

The harvest of early spring greens from the garden continues. I had always heard that you can eat dandelion greens, so I picked some of the rocket-shaped weeds growing near the pathway inside the community garden. I felt more comfortable eating these than the ones growing along the sidewalk in our neighborhood, watered by who knows how many dogs each day. Also, my plot had some overwintered beet and turnip plants that were clearly not developing harvestable roots, so to make space for new plantings I picked a bunch with the idea of eating their tender leaves rather than give up on them entirely. Now, how to eat them?

As I was pondering whether to steam, saute, or boil, another project was ready to harvest at this point: broccoli sprouts. These had been growing in my kitchen for 5 days and were now 1/2 inch long. Just needed a few hours of indirect sunlight on the counter to "green up" and we were in business. Salad seemed the way to go from here.
A couple green onions and parsley sprigs from the garden, a few radishes from the store, as the garden ones weren't quite ready, a handful of lightly toasted sunflower seeds, and a chunk of feta cheese, and it had all the makings of a potentially lovely salad.
To offset what I feared would be the bitter taste of the greens, I quickly made a strawberry vinaigrette. The strawberries were frozen, as our plants have yet to even flower, but when a heaping cup of them was thawed, then blended with 1/4 cup each of red wine vinegar, olive oil and safflower oil, plus pinches of sugar, salt and white pepper, they made a dressing to rival even my daughter's favorite raspberry dressing from Trader Joe's.

A burning question remained, however: what were the leaves going to taste like??? As it turned out, (in my most ridiculous British accent), they wahn't bahd, ahctually! Bitterness wasn't really an issue, thanks to the semi-sweet dressing and the salty cheese, but texturewise it was nothing like a Bibb or a romaine. More chewy, thanks to the thicker stems, but when I cut them up with my handy kitchen scissors, they were easier to eat. We all enjoyed the salad, and felt good knowing that our veins were now coursing with vitamin A and lots of other wonderful vitamins and minerals.

Great Greens! Part II

Inspired by our recent stretch of 60+ degree weather in the Boston area, a few days ago I went over to my plot at the community garden to remove the plastic sheeting and PVC pipe that had been serving as "hoops" to hold up the sheeting all winter long. True confessions: the picture below is actually the second hoop tunnel I constructed; the first collapsed under the weight of our first wet snow in early December. It looked something like this. Then all that snow thawed and refroze with inch-thick sheets of ice over the top of the plastic. Luckily the vegetables underneath didn't seem to know the difference.

Anyway, fast forward three months to mid-March, when a wonderful surprise awaited me: 5 raised beds full of vegetables and herbs that were ready to be harvested!

Here's a list of all the things growing in there: arugula, rutabaga, beets, turnips, carrots, cilantro, parsley, escarole, chives, green onions, chard, kale, collards, garlic. Plus the rye, vetch and field peas I planted in two of the beds to be turned over for green manure. The root vegetables are small, so I will let them grow for a couple more months until it's time to turn over the soil for the first summer plantings.

This was the first year I tried overwintering vegetables planted in the early fall, and I am so excited to do it more systematically next year! My inspiration was Eliot Coleman, whose books describing his commercial growing operation in Maine share detailed information about the various methods, planting schedules, etc. for 4-season gardening.


In gratitude for the kale and collard greens that are amazingly ready to pick in my garden in mid-March, below is a delicious green smoothie recipe that we have been enjoying every day for a couple weeks now. Despite one website's claim that eating more greens will make your beard grow in without the gray hairs, S. hasn't seen any changes in that department yet. We'll keep checking and let you know. This green smoothie is so tasty, even kids love it!

Kale or Collards Green Smoothie

Blend together for 30 seconds:
1 banana, peeled
1 organic apple, cored (skin on)
1 orange, no seeds (skin off)
1/2 inch piece of fresh ginger (peel removed)
1 cup water
Add about 4 large leaves of kale or collards. The stem can be added as well. Wash the leaves well and chop roughly before adding to blender. Push them down into the liquid a bit to make sure they get incorporated. Blend on high for about 1 minute. You may need to add a little bit more water or apple juice.

Makes about 3 glasses' worth (it will completely fill a standard blender).

Great Greens! Part I

Before we know it, the farmers’ markets will be open again and we’ll face the annual June glut of local greens. In previous years I've bemoaned this period before the "real" vegetables start to ripen in the fields, but this year I'm trying a new approach. Each week I buy several types of greens at the grocery store and road-test them on my family. (Yes the greens come from California, but what can you do?) Now my family has been eating kale puree hidden in their pasta sauce for a long time without comment, but I decided to get them involved in this little experiment. So during the initial week we tried a different green smoothie each day, which I will share more about in the next post, and those recipes all used swiss chard or collard greens.

This past week I bought mustard greens for the first time and was unsure about what to do with them. As it turns out, mustard greens are much more, shall we say, delicate than kale or collards and as a result, after nearly a week in the fridge about half of the bunch was too rotten to use. It’s a shame, but thankfully they will still be able to contribute to our household in the form of compost. And with the remaining half bunch, I improvised a quick recipe that turned out to be quite good. As my time was very limited, no chopping of garlic or onions for this one. No picture either, sorry!

Capellini with Mustard Greens and Sundried Tomatoes

Serves about 4
30 minutes or less

Skill level: Easy

1/2 bunch mustard greens, chopped roughly and washed well, then dried
1/3 cup sundried tomato slivers, packed in oil
1/4 t garlic powder
1/4 t onion powder
2 cups prepared tomato pasta sauce

1/2 lb capellini pasta

1/2 cup shredded parmesan cheese
1/4 cup pine nuts, lightly toasted (optional)

1. In a wide skillet on medium heat, add the sundried tomatoes with a teaspoon of their oil. Stir in the greens. Sprinkle garlic and onion powder, stirring the greens to coat. After a couple minutes, turn the heat down to low and cover. Let cook about 10 minutes until greens are tender.

2. While the greens cook, bring a medium pot of water to boil and cook capellini according to package directions. Drain, toss with a small amount of olive oil and set aside, covered.

3. Once greens are tender, stir in pasta sauce, cover again and let simmer another 5 minutes.

4. While pasta sauce is simmering, toast the pine nuts in either a small skillet or toaster oven pan. Watch carefully to prevent them from burning. Shred the parmesan cheese.

5. Serve sauce over the pasta, with parmesan and pine nuts on top.

Storage/Leftover tips:· Store leftover sauce and pasta separately.
· Sauce can be used over eggs, as a topping for veggie burgers, or over polenta.
· Pasta can be mixed with quiche filling in place of using a crust, served as cold sesame/peanut noodles or added to stir-fried veggies and tofu.